


Hasbro’s designer Sam Smith, via his Instagram account, has treated us with some great turnaround videos of the recently revealed Masterpiece Movie MPM-13 Blackout.
We have not only two 360-view videos of Blackout in robot and alt mode but an extra video featuring Scorponok. To top it all, Sam is also sharing very interesting comments about the development of the Masterpiece version of one of the most well-remembered Decepticons from the live-action movies.
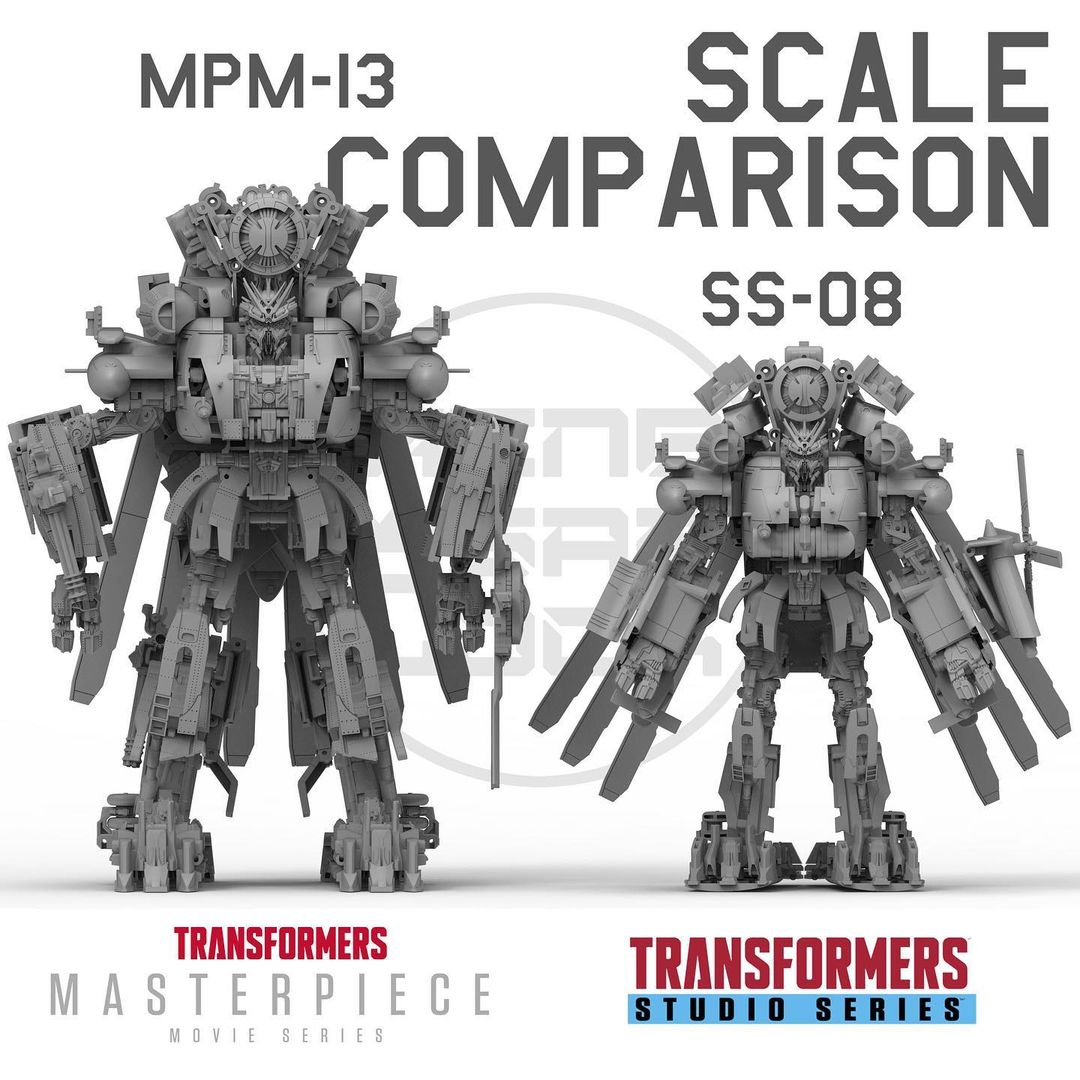
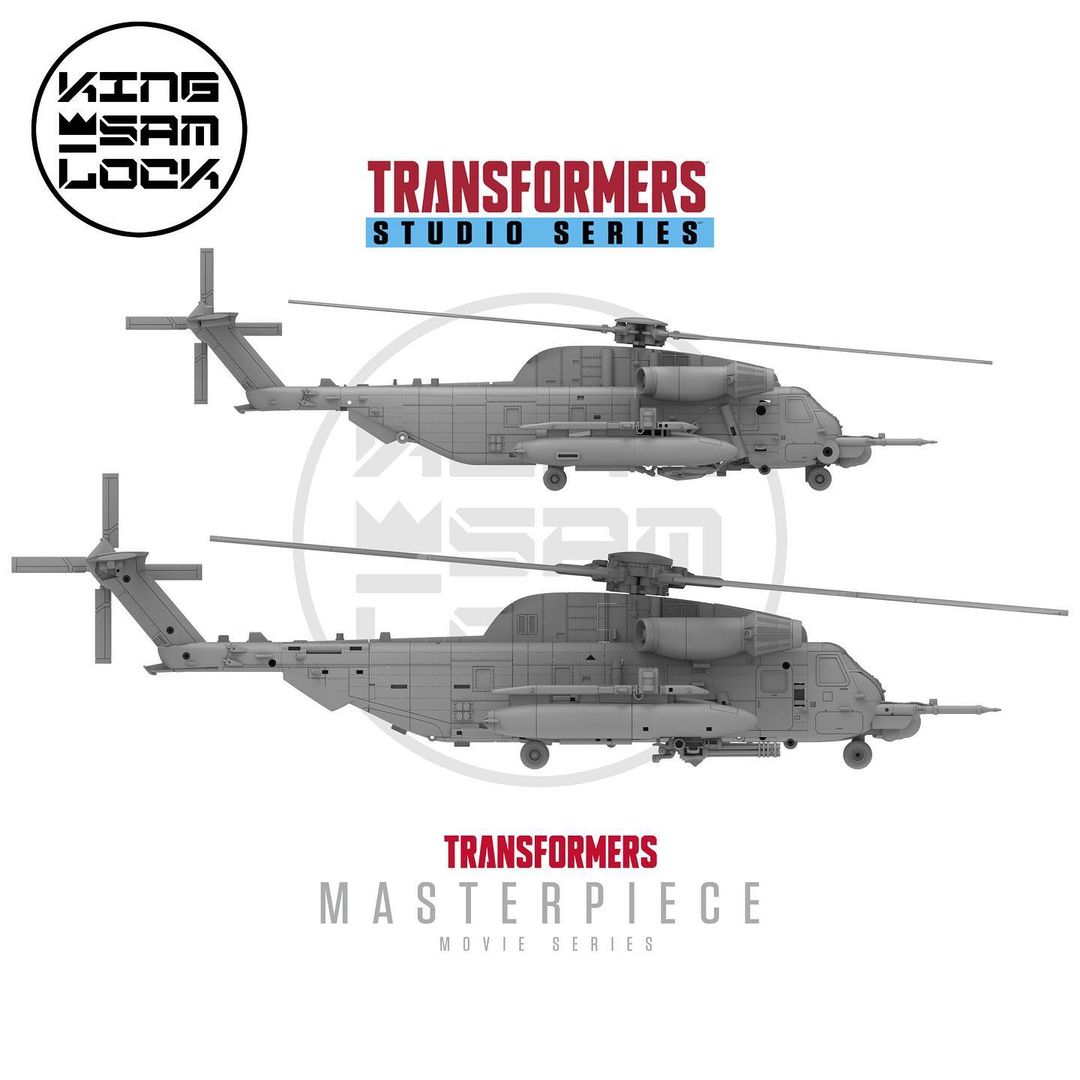
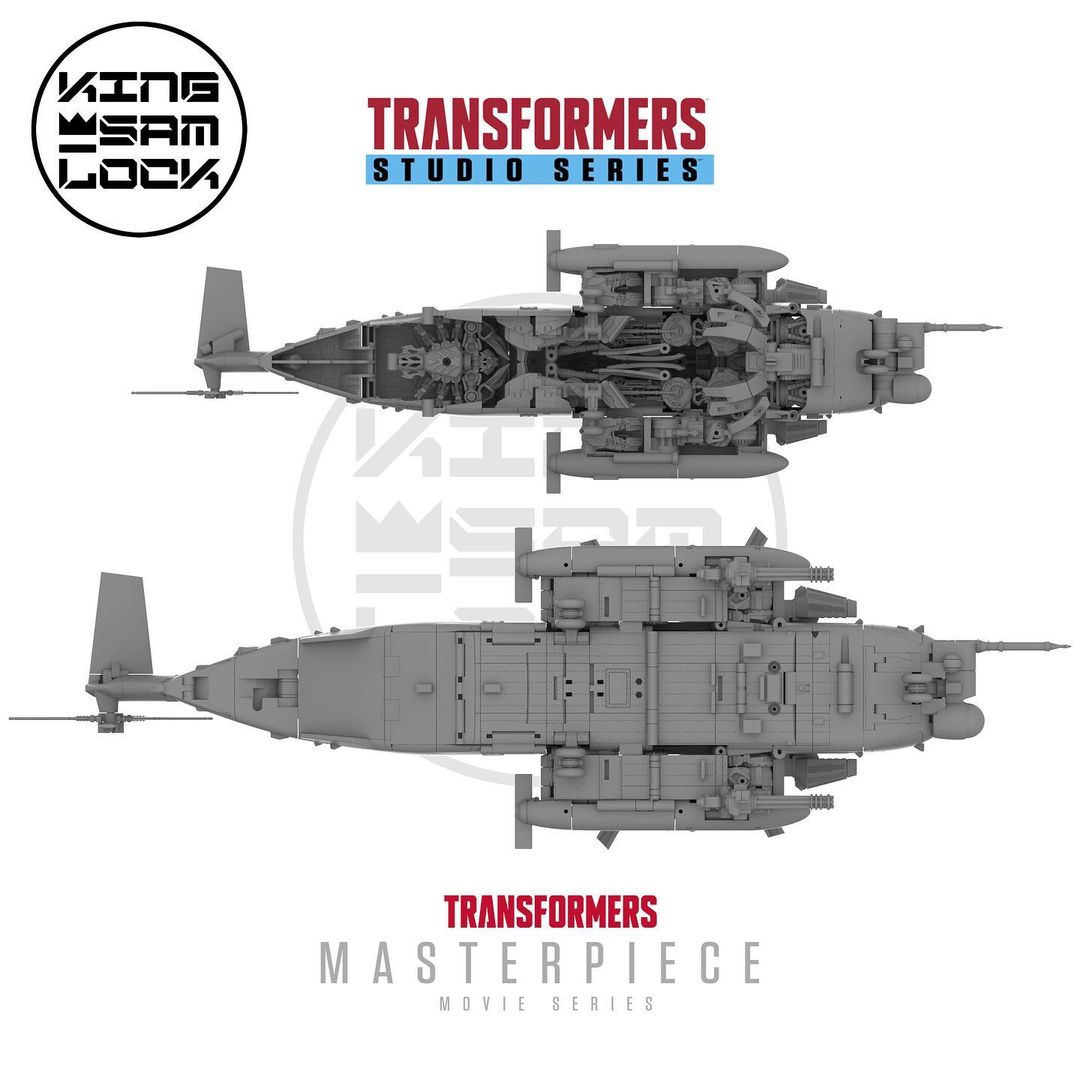
Update: Sam Smith have just uploaded a set of CAD file comparison images of MPM Blackout and SS Blackout/Grindor for those wondering about scale.
Not much left to say, so you click on each title to watch Blackout robot mode video, Blackout alt mode video and Scorponok video. Alternatively, you can watch a YouTube mirror after the jump together with Sam’s comments after the jump.

*Comments from 360 robot mode video
MPM-13 Movie Masterpiece TF1 Blackout
“Blackout incoming… All hail Megatron!”
Im thrilled to officially share the US debut of MPM Blackout. This was such a fun character to develop with Tomo Tatsumi at Takara Tomorrow. Blackout was by far my favorite design from the first Transformers film, and it was great to get the chance to contribute to an all new version of the figure.
This bot mode is loaded with articulation, fine textures, painted mechanical working, weathering and never before used details. We tried pulling out all the stops to set this figure apart from the Studio Series Release. There are so many exposed tech panels, where we were able to treat the figure with metallic washes and dry brush effects, while also highlighting some awesome copper details to really make them pop. Every piece of dark exposed metallic plastic, was treated with some level of weathering to capture the distressed movie look.
I think the detailing that I was most excited for the on robot mode have to be the subtle additions to the face (yellow pin striping over the eyebrows) along with the “NO STEP” printed on the tops of his hands, as you see him reaching for the server unit inside of the base.
As we make our way to the weaponry, this Blackout is geared up. The figure includes dual mind guns which can be utilized in both robot and vehicle modes, along with a rotating chest port to reveal the chest cannon that he uses in the airfare base. Additionally Blackout includes 2 all new PVC blast effects which use our 3mm post system, and can be plugged into any of these weapon locations.
Lastly, he includes his screen accurate arm mounted rotor blades, with a rotating top surface to alternate between the helicopter accurate face, vs the robot weaponized surface.
Stand tuned for more details when I cover off on a traditional Screen to Toy breakdown for MPM Blackout.
*Comments from 360 alt mode video
MPM-13 Movie Masterpiece TF1 Blackout
“Sir, it says here 4500X was shot down three months ago in Afghanistan.”
“That’s got to be a mistake, check again then re-check”
There is so much detail on the vehicle mode for Blackout, and it was great to have a format to help bring some of those details to life. Blackout is based on a licensed Sikorsky MH-53 Pave Low helicopter (USAF REG 4500X). As far as the helicopter is concerned, it is the most accurate representation that we have ever taken on. It features an enclosed finished bottom to the hull, a function cargo ramp (to store Scorponok) articulating tail fin, rotors and fuel rod and landing gear.
Did I mention that this helicopter is massive? 21.5 inches long from end to end vs the Studio Series version at 17.5. and it has the ability to stow like a real MH-53.
The alt mode also features green tinted overhead windows to help cut down on the glare for the pilots, yellow window gaskets, and painted cabin windows along the full hull. From all the latch release, no step, pilot markings, lighting, and engine pin striping. I did my best to capture everything that we see in the film. There were so many compelling fine details that we discovered while sifting through thousands of Maya texture files, and it was great to see them applied to the helicopter.
Stand tuned for more details when I cover off on a traditional Screen to Toy breakdown for MPM Blackout
*Comments from 360 Scorponok video
MPM-13 Movie Masterpiece TF1 Scorponok
“NO, I DON’T HAVE A CREDIT CARD!!”
You can’t have Blackout with out Scorponok. A great companion piece, with some nice die-cast to the torso to add some heft the the character. Scorponok stows nicely into the rear storage compartment of helicopter.
His body is equipped with 10points of articulation, and he gets a good amount of bronze metallic paint to help accentuate some of his sculpted detail. At 5.5” long he’s a pretty sizable companion addition to the pack.
Stand tuned for more details when I cover off on a traditional Screen to Toy breakdown for MPM Blackout.


f-primusunicron
wider feet, bigger "looking" biceps…thats it
Khelthorn
I just transformed him again. He is most certainly my favorite of all of my figures. I absolutely love how he looks in both modes and get an extreme amount of joy looking at both. I really hope someone makes an OSKO of him. Besides the size, I really don't know what they could realistically improve. Maybe slightly tighter joints.
Khelthorn
Well, I bought it. Of course we are in the vehicle phase of my collection, but I waited long enough to make sure it fit before transforming him. Thanks again for pointing it out for me.
Khelthorn
I was totally unaware that there was another hinge under there. Thanks man! You have actually corrected two different things I missed and I've had this guy for months.
Dexatronic
Open the shoulder, extent the double hinge and then push it in over the tab under the engine and tab the back fuel pod stabilizer into the slot on the back
View attachment 30276131 View attachment 30276132 View attachment 30276133 View attachment 30276134 View attachment 30276135
Khelthorn
I think what they are referring to is under the jet intake pylon things are kind of hooks, the shoulder pieces can be angled up to slide over those. That also allows the back fins of the shoulders to slide in to the little slots on the back. I can't do more in depth pics at the moment but quick reference included.
View attachment 30275757
Movie Convoy
The helicopter parts on the shoulders swing up on double hinges to plug into tabs on the underside of the intake parts.View attachment 30275753
Lorenzo
Teach me
Dexatronic
Im sure you realize this but every one of your pics you haven't transformed the shoulder's correctly.
Khelthorn
During the movie it's pretty hard to make out. But looks more like hydraulics than anything but I see what you guys are getting at.
Lorenzo
Just 2 lines but everything tab pretty well
Purple Heart
View attachment 30268544
mx-01 archon
The cables are to approximate how the character actually looks on-screen. The toy's skinny biceps are essentially only the endoskeleton, and the CG model has this bulky "sleeve" of wires that conceal them.
There was a small, but vocal bit of bellyaching when the toy was revealed, at how skinny his upper arms were, where the CG showed them as being pretty bulky. The missing sleeves is why there's the difference.
To be fully accurate, there needs to be like, ten times the wires, forming almost a net, but that would impede the transformation. There's not enough space under the pontoons for that all to tuck away.
Khelthorn
I meant the sections you cut that go on the back, when it's in helicopter mode, what does it look like? There will be lines I imagine.
Lorenzo
Everything is hidden
Khelthorn
Why the cables? What does it look like (the modified panels) in alt mode?
tonysandlin
That’s sick. I’ve been thinking of doing that. Is it hard to get things aligned?
Lorenzo
I've added some cables in the arms, still can transformView attachment 30268070 View attachment 30268071 View attachment 30268072 View attachment 30268073 View attachment 30268074
Lorenzo
Well, here is a little mod, for in my opinion improve the backpackView attachment 30265233
Cut that long piece, just 2 cmView attachment 30265236
Glue the piece into the other panel (that one goes into the chestView attachment 30265235
This is how I place the pieces into the chest
View attachment 30265234
And here is the result
Now it's 5% better lol
I'm looking for a way to move some kibble to the feets to make them bigger
Khelthorn
Awesome, thanks for the link. I had looked on ebay months ago and got nothing, I hadn't checked in some time though.